Gate and Hinge Glass Panels
 CAUTION: When handling heavy glass panels, use the buddy system to handle the glass.
Glass Pool Gates can be installed in many different combinations. They are typically installed:
- to a wall
- to a post
- or to another Glass Panel called a ‘Hinge Panel’.
All Glass panels purchased from Trade Glass Depot are supplied with the necessary holes and cut-outs to fit the hinges and locks. For more information on our products, please check our Glass Hardware page.
Shop Our Glass Hardware RangeExample Set Up

This is a 12mm glass hinge panel and 8mm glass gate panel assembly. Both parts are supplied with the relevant holes for spring hinge and latch fitment.

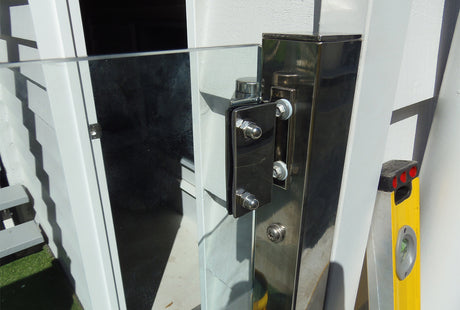
This is a 12mm glass hinge panel and 12mm glass gate panel assembly. Both parts are supplied with the relevant slots for hydraulic hinges and holes for latch fitment.
TIP: Since hydraulic hinge gate panels are 12mm thick and heavier than the spring hinge 8mm gate panel, it is advisable to strive for a gate which is around 30% smaller in size / weight than its supporting hinge panel.
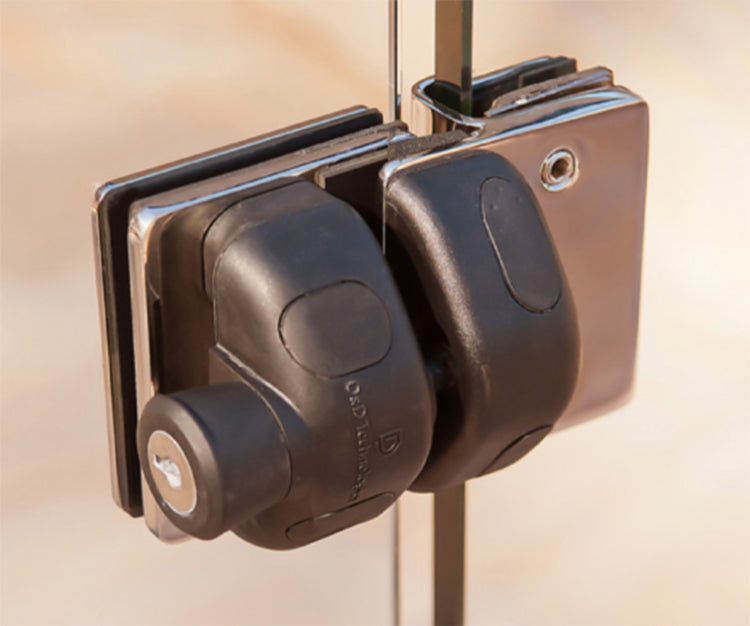
‘Glass-to-Glass’ latches use a friction plate to connect to the latch panel so any 12mm glass panel can be used as a latch panel:

TIP: Ensure the glass is clean around the fitting surface so a small bead of clear silicone can be applied to the latch bracket, top and bottom, ensuring it will not become mis-aligned during the years of use.
These are the various hinge and latch combinations the TGD systems can accommodate.

Glass-to-Glass 180° hinges with a Glass-to-Glass 180° latch.
- Stainless steel hinges and Latch set
- Allow Gate width + 30mm fitting allowance

Wall / Square Post-to-Glass hinges with a Glass-to-Glass 180° latch.
- Stainless steel hinges and Latch set
- Allow Gate width + 40mm fitting allowance
Round Post-to-Glass hinges with a Glass-to-Glass 180° latch.
- Stainless steel hinges and Latch set
- Allow Gate width + 30mm fitting allowance

Glass-to-Glass 180° hydraulic hinges with a Glass-to-Glass 180° latch.
- Min. 316 Stainless steel hinges
- Allow Gate width + 20mm fitting allowance
Wall Glass-to-Glass 180° Hydraulic hinges with a Glass-to-Glass 180° latch.
- Min. 316 Stainless steel hinges
- Allow Gate width + 20mm fitting allowance
These are the various latch and lock combinations Trade Glass Depot can accommodate

Corner-in Latch & Lock

Corner Out Latch & Lock

STOP!Pool Fence Regulations - A maximum of 10mm clearance between gate panel and latch should be maintained to ensure correct operation of the magnetic striker, and to comply with pool gate regulations.
How to Install the Gate
1. When the hinge panel has been core-drilled or base mounted, de-tension your hinges and fit them loosely to the gate panel.

2. Supporting the gate assembly, attach the hinges to the hinge panel and hand tighten the fixings.

3. Position the gate at 90degrees to the hinge panel and chock the bottom of the gate panel to support it.

4. Ensure the gate is square and well-aligned. Tighten the hinge fixings on the gate.
For any further assistance, please do not hesitate to contact us directly! We can promptly identify and provide you the best possible solution available.
Shop Our Glass Hardware RangeHow to Install a Latch
Latch Installation
1. Fit the latch to the gate and the latching part to the latch panel. Check / adjust for alignment, ensuring the gate opens and closed easily.
2. Re-tension the hinges and check for reliable operation
De-tensioning a Spring Hinge
1. A tensioned spring hinge as supplied:

TIP: Note where the stop-pin is at rest on a tensioned hinge; this reflects the direction of tension which you will need to observe later.
2. Insert the adjustment tool into one of the holes at the top of the hinge:

3. Over a bench or table, rotate the tool approx. 120° anticlockwise (against the tension) and hold the tension:

4. Remove the loose-fitting stop-pin and store safely until re-tensioning.
5. Allow the tool in the collar to return to its original position:

6. Remove the tool – the hinge is now de-tensioned:

7. Repeat for the other hinge.
Re-tensioning the Hinges
- Re-insert the stop-pin by rotating the collar with the holes by use of the adjustment tool.
- Holding the tension, insert the stop-pin into one of the holes
- Now test for desired tension – the stop-pin’s location can be changed to increase or decrease the tension.
TIP: Ensure BOTH hinges are set to the same tension before fitting. Carry out any final adjustments when the gate is in position.
Still Unsure on Installing Pool Gates, Latches or Hinges?
Don’t stress! Trade Glass Depot can assist you in this matter. Contact us directly to quickly resolve the issue. Otherwise, check out our Glass Hardware page to find the right gate, latch, or hinge for your glass pool fence.
Shop Our Glass Hardware Range