Before You Start
Your Site Will Require:
- A hard, level unloading surface suitable for a pallet jack
- Sufficient access / unloading area
- Flat storage area with a clean timber pallet (or similar) and clean timber rails for separation and protection
- Mains Electricity - 240V, 10AMP
- Clean water, a bucket, sponge and hose
- Hilti (or similar) Core drilling machine (hire)
- CORE DRILL bit / ‘barrel’ 76mm dia.
- Good quality Allen key set
- Plumb line / Spirit level
- EPIREZ / RAMSET / CHEMSET101
How To Set The Spigot Spacing
Follow the guide below to ensure your spigot positioning complies with TGD’s testing, AS1288 and glass panel span regulations.


Preparing To Fit Round or Square Core Drill Spigots
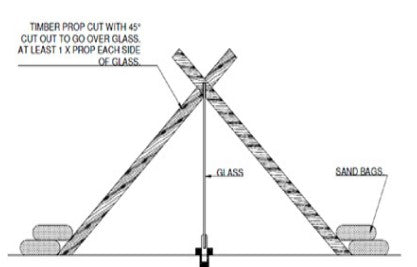
Timber Props
- Two timber props per glass panel will be required during installation for the grouting process
- Each prop needs to be at least 75mm x 45mm x 1800mm long (framing pine is suitable)
- Cut each end at 45degrees
- Cut a 12-14mm slot at 45 degrees approx. 1700mm from the end of the timber as shown below
- Prepare some sand bags or similar to secure the props when in use
Core Drilling


How Deep Does The Core Hole Needs to Be?
Depending on the required glass panel gap and what material is laid on top of your concrete slab, you will need to drill the holes 100-140mm deep. Since the glass panel will generally rest 50mm above the surface, you may need some TGD spigot extensions if your pavers and bedding is very thick or if you require a 70-100mm gap under the glass panel. You can talk to the friendly TGD sales team about this.
 CAUTION: All slab coverings will vary in depth so make certain the core hole is deep enough to accept the spigot for grouting.
EXAMPLE: Both with similar pavers and bedding with a 50mm gap (110mm hole depth) and a 70mm panel gap (140mm hole depth with the use of an extension)


Dealing with Concrete Fall
Areas around pools etc. may have up to 40mm fall for drainage purposes. In order to maintain a straight and level top fence line, extra spacing blocks will be required where the 50mm blocks are used beneath the glass panel.
Electrical Earthing
If any section of your pool fence is closer than 1250mm to the pool, all the metal components will require earthing. After core drilling, conduit will now be visible with the cores removed and wiring can commence as the spigots enter each hole prior to grouting. When new fences are within 1250mm from the water, your pool builder or electrician will have laid a conduit for earthing wires to run in along the fence centre-line. If you are fencing an existing pool, you may already have earth wiring present – it could be found anywhere around the slab’s edge or even under decking, usually leading to the pool pump etc.
After core drilling, conduit will now be visible with the cores removed and wiring can commence as the spigots enter each hole prior to grouting.

Marking Out
Using a string-line, mark the centre of each run (in relation to any electrical conduit required) and where the spigots will intersect, not forgetting to also mark out where the glass panels and each gap panel will fall. Double check all your dimensions are correct before proceeding.

Core Drill Template
If your core driller does not come with a starting template, construct one as below. This template is necessary since the coring drill does not have a centre drill and the centre lines will be an aid to alignment:

Preparing the Glass Panels
Use protective foam on your stands:

Core Drilling

- Core drill as per your set-out
- Add tape to the drill piece to act as a reliable depth marker (100mm minimum not including pavers or tiles).
- Begin with the starting template and then continue to drill the full depth
CAUTION! Drill each core hole and clean the area of debris and slurry quickly with sponge and water to prevent staining of adjacent features.

Installing the Glass Panels
- Mark out and fit your spigots as per your set-up plan
- Ensure each spigot is fitted squarely to the glass panel and tighten each grubscrews
- Fit the two or three spigots to each glass panel as per your set-out measurements
- Follow this pattern of assembly so all the glass panels match in appearance when the fence is complete


Using a spirit level, props or wooden stays, adjust the panel to the vertical and weight the props so they cannot move. On soft ground, stakes and timber can be screwed together or pre-cut timber props:
- Using your timber props and sand bags etc., brace the glass panel both sides
- Adjust the panel to achieve vertical alignment of the glass using a plumb line and spirit level

NOTE: Braces and props are required until the grout has fully cured.
Where panels are side by side, it is possible to set up 2 or 3 together.
Quick alignment along the run is achieved by clamping the glass panel to the next one with timber blocks and Quick-Grips or blocks of timber screwed together as above, along with another stay, following your fence gaps as per set out.
Grouting
Make your final checks and, following the manufacturer’s instructions, mix your chosen grout / EPIREZ to obtain a pourable ‘milkshake’ consistency sufficient for 2 core holes minimum.
Using an open funnel / chute, pour the grout mixture into the holes.

Adjustment
When the grout is fully cured, remove the stays and repeat the process for all panels. Any vertical adjustment can be achieved with the grub screws whilst horizontal adjustment is achieved by the use of rubber packers under the glass panel.
Clean the panels as per your Care and Maintenance Guide.
Clean up your work area.